How to Create a WordPress Blog (from scratch, for complete beginners)
Something incredibly exciting when you create a WordPress blog. As soon as you install WordPress, a world of possibility opens up.
Something that didn’t exist before now does, and you made it happen.
I still get that feeling when I look at my first blog post. I was sitting in a gray cubicle in Nebraska when I set it up. I got the feeling that I had just done something very good for myself.
Though this tutorial is written for complete beginners. Even if you have no aspirations whatsoever to learn web design, you can follow this tutorial.
But, since I teach people about web design, I’m going to talk a little about why creating your own WordPress blog is great if you want to learn web design.
I used my blog as a playground to learn web design, practicing my skills in HTML and CSS. Through writing on my blog, I also learned how to write a book.
Eventually, my blog got my a job as a web designer for a startup in Silicon Valley. Now, I have one of the top books for learning web design.
I have my blog to thank for all of it. It gave me a place to hone my skills, and build my audience.
Today, I want to teach you how to create your very own WordPress blog, from scratch, on your very own domain, with your very own hosting plan.
Why you need a hosting service for your blog
Having a hosting service for your blog is especially important if you’re going to be practicing your web design skills.
Once you have web design clients, your clients will want you to set up their websites on a server. You can’t just give them a print-out and expect them to be happy.
So, having a hosting service is critical for your blog. Your hosting service takes care of configuring the server so your blog can be viewed around the world. They work around the clock to make your site is working, even when you’re sleeping.
Why choose HostGator as a hosting service?
There are countless hosting services out there. The selection can be dizzying. I promote HostGator as an affiliate for anyone who is just starting out. (For advanced WordPress users, I tend to recommend my WP Engine coupon, but they’re much more expensive. To learn more, read my WP Engine review.)
In my experience, the important things to look out for in a hosting service are:
- Reliability. You don’t want your website to go down. HostGator has a 99.9% uptime guarantee. That’s insanely high.
- Support. Making and maintaining your first blog will take some work, and sometimes you get stuck. HostGator has support all day, every day of the whole year.
- Price. Especially for your first blog, you don’t want to overpay for your hosting. HostGator has some of the most affordable plans out there.
Do I need a domain?
You know when you go to “google.com,” or “wikipedia.org?” Those are domains.
When you create a blog on HostGator, I definitely recommend a domain. Without a domain, it’s still possible to access your blog, but you’ll have to type in something like http://192.168.1.1/~yourusername.
Doesn’t exactly roll off the tongue.
If you ever want anyone to visit your blog, it’s much easier (and feels better) to tell them “just visit myname.com!”
Your domain points to your server, and serves up your blog so people can see it. People type your domain into their browsers, and BAM, there it is.
Step 1: Register a domain on HostGator
There are countless places where you can register a domain (called “registrars”), but to get started with your blog on HostGator, it’s much easier to use HostGator. Otherwise, you find yourself typing in complex configurations with your registrar to get the domain to point to your host.
Go to HostGator’s domain search by clicking here. You should see something like this.

- Type in the domain you want, to see if it’s available. Lots of domains are already taken, but you may want to try .co, .info, etc. (instead of “.com”). For example, myname.co, instead of myname.com. In my case, I couldn’t believe myawesomeblog.com wasn’t already taken!
- Decide on Privacy Protection. Domains have to have contact information displayed in directories. You can either have your name and address publicly available, or, you can choose Privacy Protection. I happen to have a separate mailbox, away from my home, so I don’t choose Privacy Protection.
- Click on “Continue to Checkout.”
Now, you’ll be prompted to create your HostGator account.
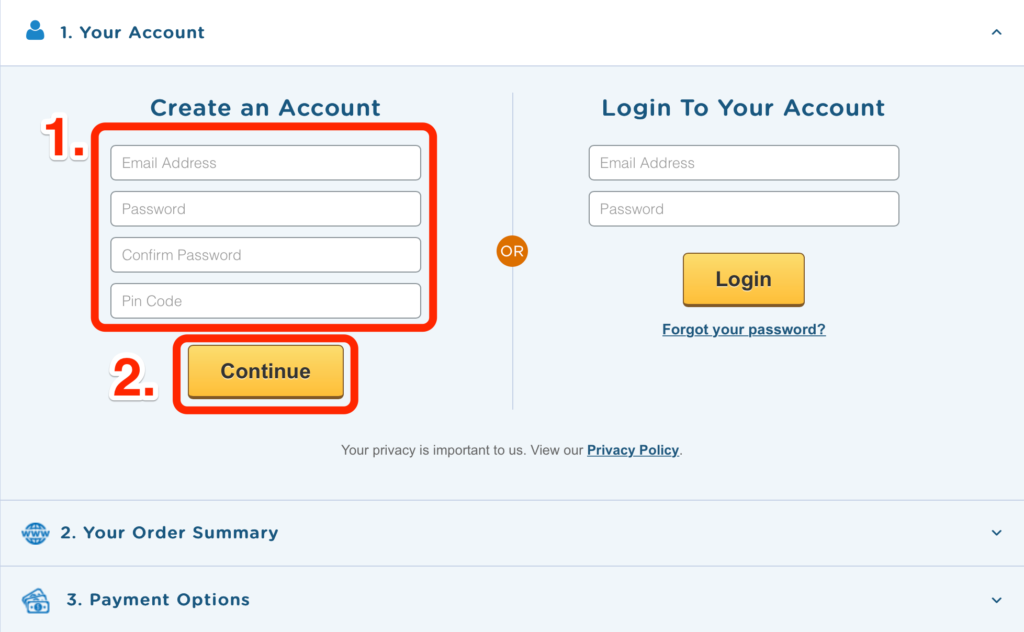
- Enter your email address, password (twice, to make sure it’s right), and type in a pin code of your choice. (This keeps your server secure, like an ATM pin code)
- Click on “Continue.”
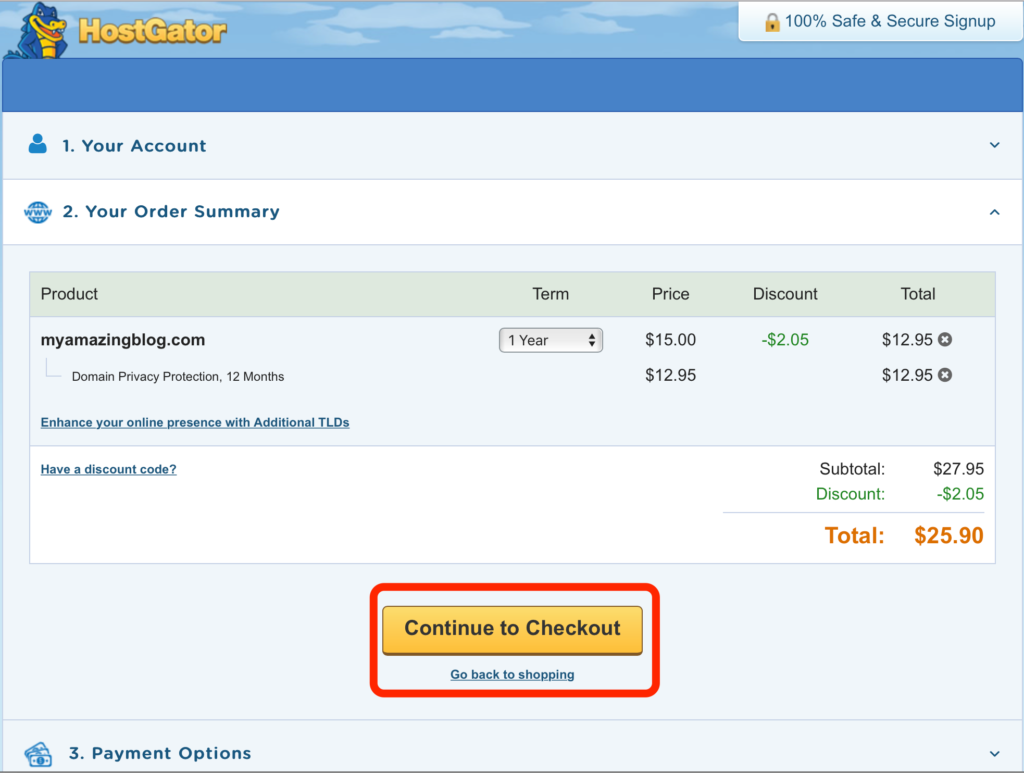
Next, you’ll be prompted to verify your order summary. Once you’ve done that, click on “Continue to Checkout.”
Next, you’ll be prompted for your payment information.
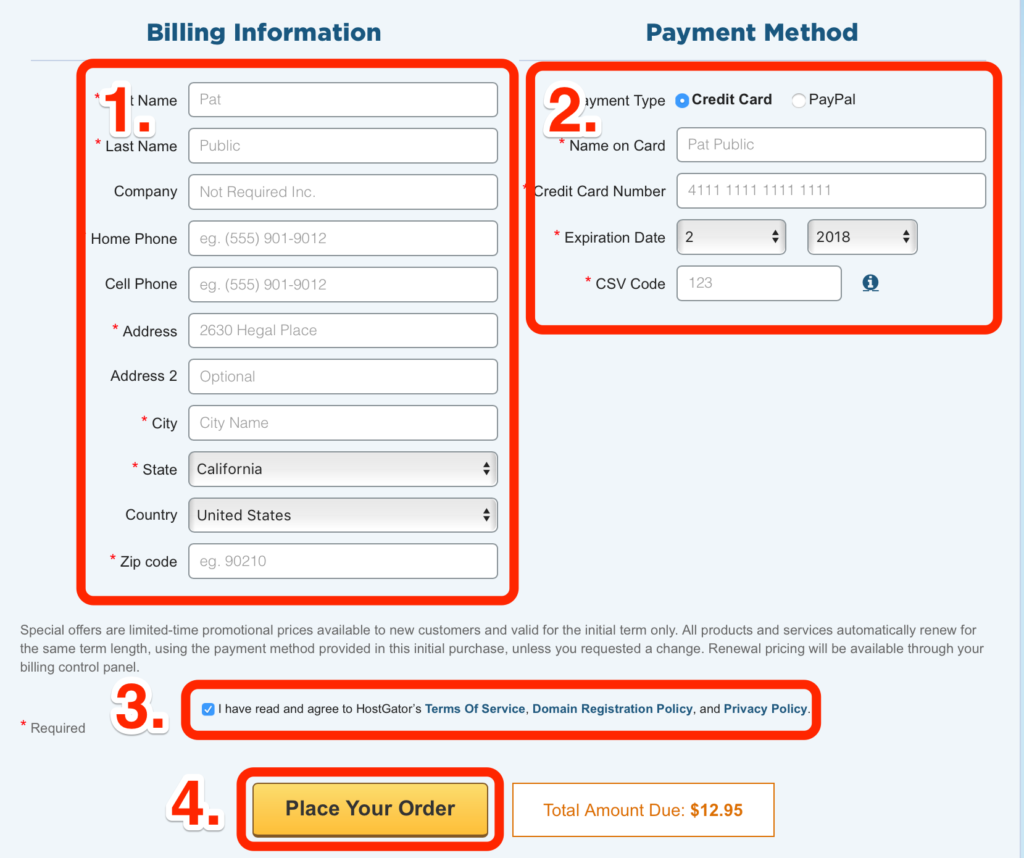
- Enter your Billing Information. This is the address where you receive your credit card statements.
- Choose your payment method. Enter your Credit Card information, or, if paying with PayPal, choose the PayPal button, and enter your details.
- Review the Terms and, if you agree, check the box.
- Click on the “Place Your Order” button.
Congratulations! You’re the proud owner of a domain!
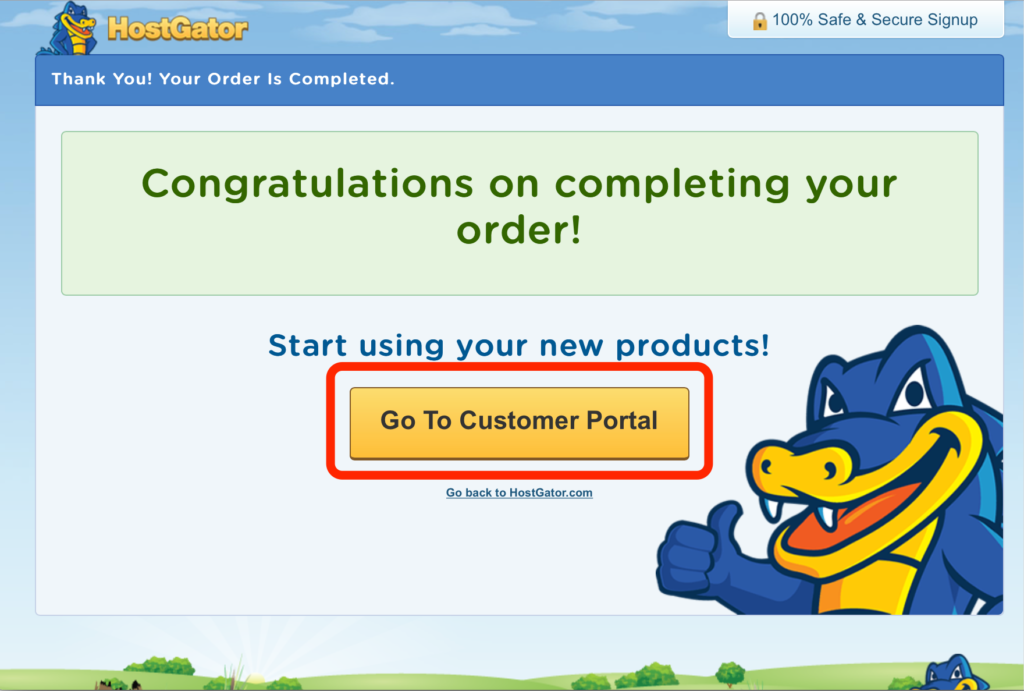
Click on “Go To Customer Portal,” and we’ll set up your hosting plan.
Step 2: Set up your HostGator hosting plan
Now that you have a domain you can point to your hosting server (don’t worry, this will be easy), you need an actual hosting plan, or a server. You’re going to host a WordPress blog on HostGator.
Your server is a computer, stacked together with hundreds of other computers, in a room somewhere. This is where your site will live, and HostGator will make sure that computer is running 24/7, and serving up your site around the world to whomever accesses it. (This service, along with your server, is your “hosting plan.”) Exciting, huh!?
If you clicked on “Go To Customer Portal” at the end of the previous step, you should be looking at the Customer Portal. Something like this:

- Click on the “Hosting” tab.
- Click on “Get a Shared Account!”
Now, you should see some options for hosting plans. It should look something like this:
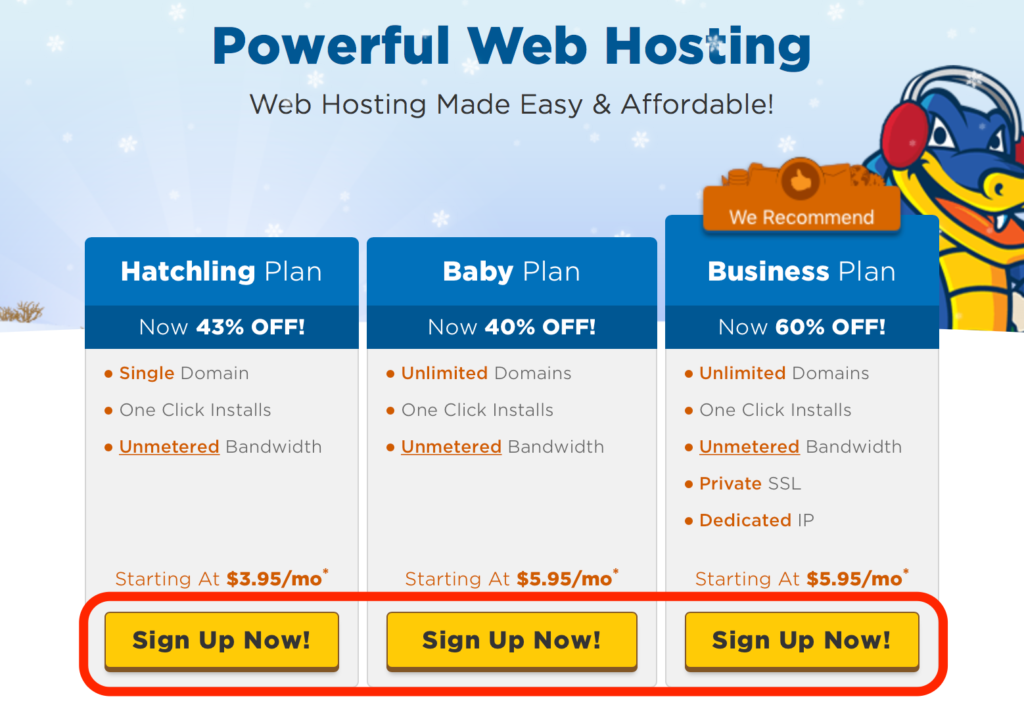
Choose a hosting plan. If this is your very first hosting plan and domain, I’d recommend going with the “Hatchling Plan.” It will get you started, and you can always upgrade later.
All of the plans have unlimited bandwidth, which means you can transfer as many files (such as the pages and graphics on your blog) as you want (such as when people visit your website).
But, if you like the features and price of one of the other plans (for example, starting with the “Baby Plan,” you can host unlimited domains), go for it.
Once you’ve clicked on the “Sign up Now!” button for your hosting plan, you’ll be prompted to choose which domain you’ll use on your hosting plan. Like this:
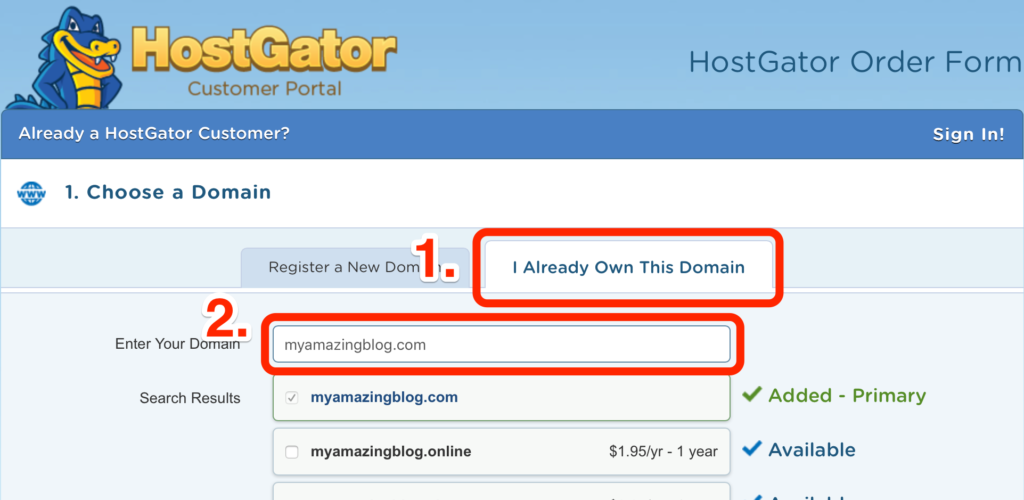
- Click on the “I Already Own This Domain” tab.
- Enter the domain name you purchased in Step 1.
Scroll down to choose your hosting plan details.
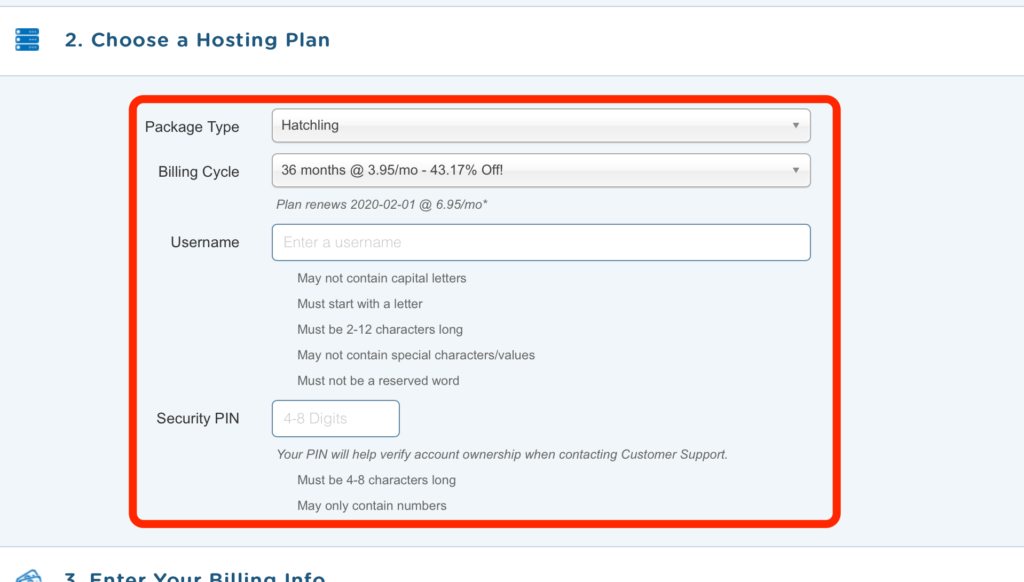
Enter your hosting plan details. Choose your Billing Cycle (you save more by buying more months up-front), choose a username (for logging into the control panel), and choose a Security PIN (this isn’t necessarily the same PIN you used in Step 1, though you can choose to use the same PIN.)
Scroll down to fill out your billing information.
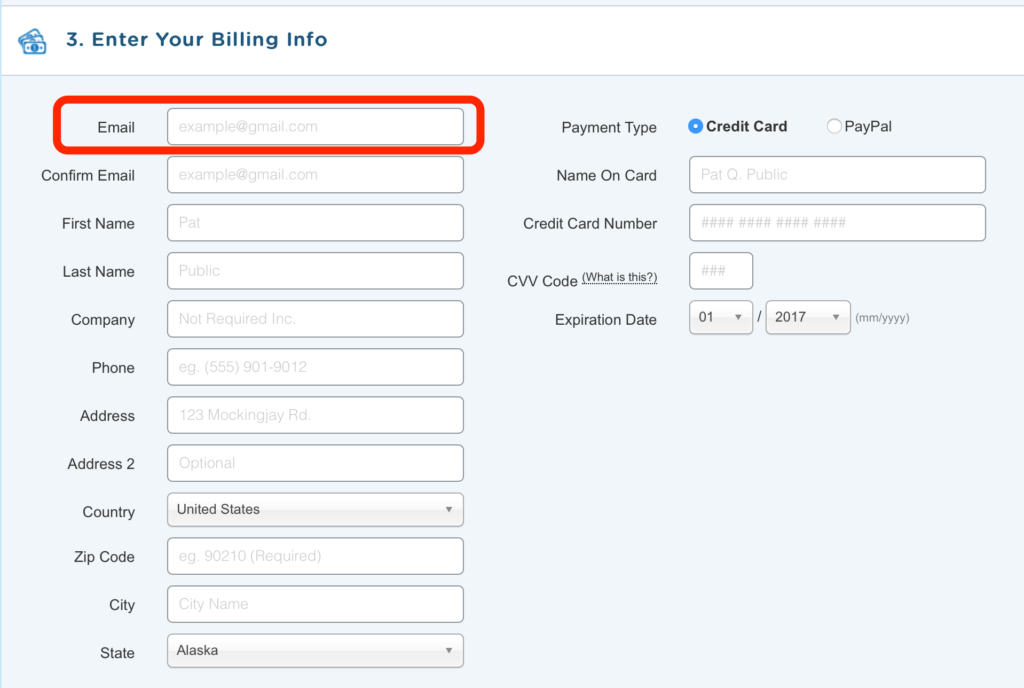
Enter your email address. Use the same email address you used to buy your domain in Step 1, and the form will magically detect that you already have an account!
A login form will appear!
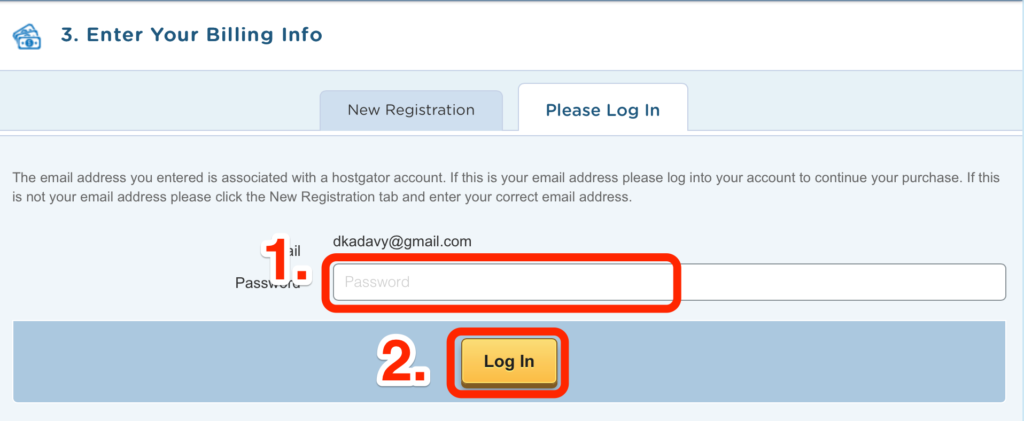
- Enter the password you created in Step 1.
- Click on the “Log In” button.
The credit card you used in Step 1 will appear as a payment option.
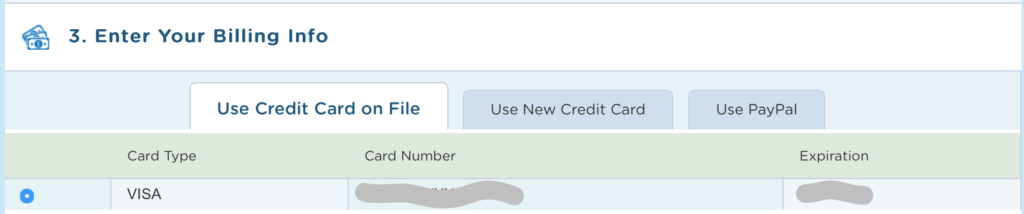
Choose your payment option. You also have the option to choose a new credit card, or use PayPal.
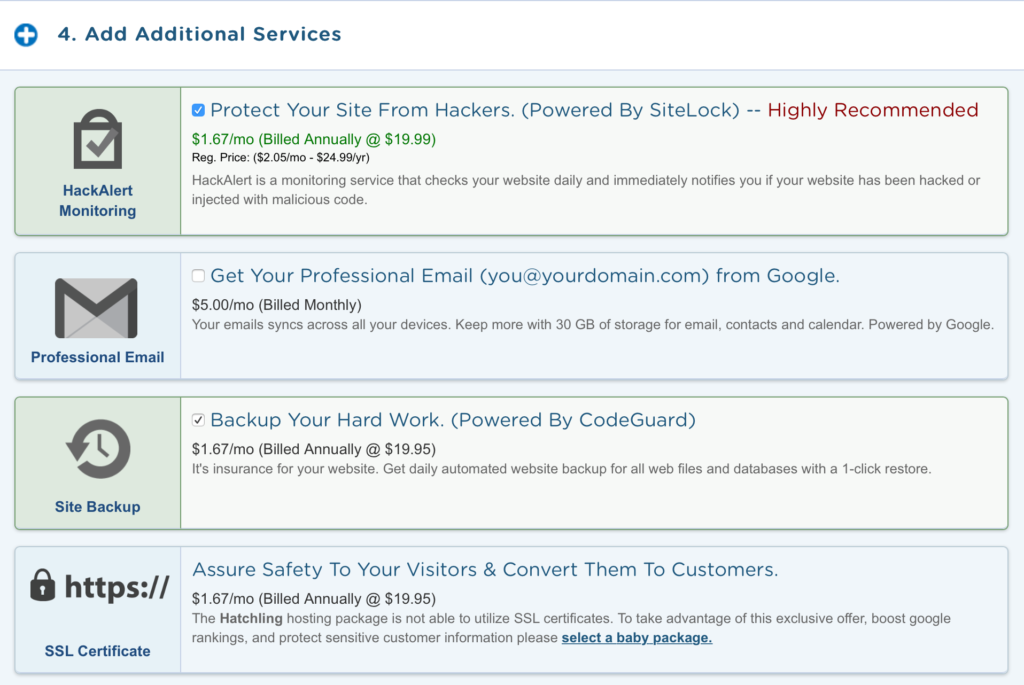
Choose any additional services. I personally like “Site Backup,” in case I mess something up. Messing things up is really the point when you’re learning web design.
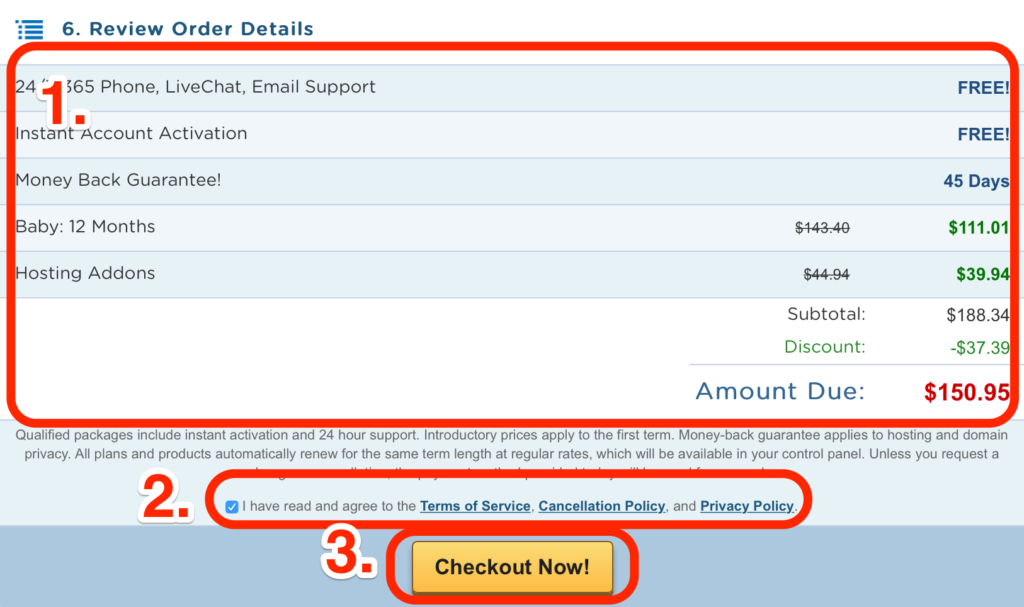
- Review your order details.
- Review and agree to Terms.
- Click on “Checkout Now!”
HostGator will start setting up your hosting plan.
Step 3: Install WordPress on your HostGator server & Create WordPress Blog
Okay, you’ve accomplished a lot already. You have a domain, and now you have hosting. All you have to do now is install WordPress (don’t worry, HostGator makes it easy). You’ll have your very own blog for the world to see, and for you to do whatever you want with.
Check your email. HostGator should have sent you an email with a subject line like “HostGator.com :: Your Account Info.” Open it. (Note: there may be another email for confirming your domain registration. You should get to this once you’re done SETTING UP YOUR VERY OWN BLOG!)
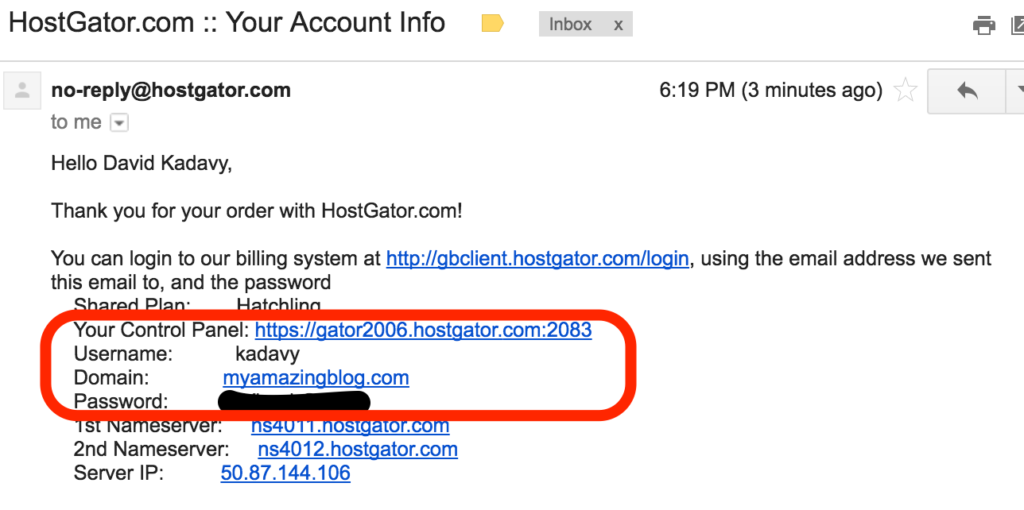
- Remember, or write down, your username.
- Select, and copy your password.
- Click on the link next to “Your Control Panel.”
Note that your “Control Panel” is different from the “Customer Portal” that you visited at the end of step 1.
The Customer Portal is the portal to all of your HostGator services, including domains and hosting.
Your “Control Panel” is to control a particular hosting plan.
Anyway, after clicking the link in your email next to “Your Control Panel,” you should see something like this.
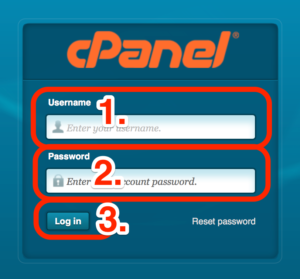
- Enter the username from the email HostGator sent you.
- Paste the password you copied from the email HostGator sent you.
- Click on “Log In.”
You should see your Control Panel, where you can manage everything on your new hosting account.
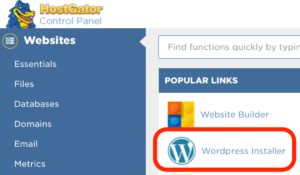
Click on “WordPress Installer.”
You’ll be prompted to select the domain on which you want to install WordPress.
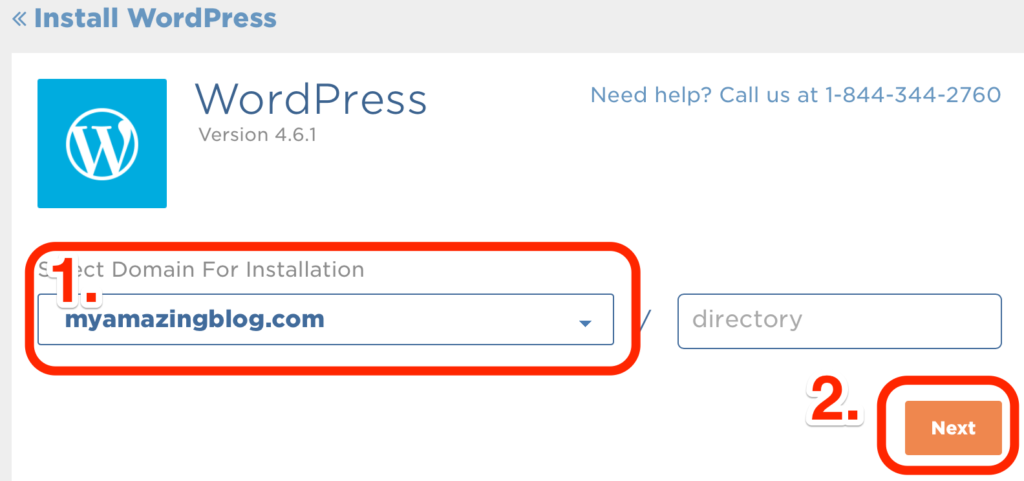
- Select your domain. If you’re following these instructions exactly, there should be just one option!
- Click on “Next.”
You’ll be prompted to enter the details for your WordPress blog.
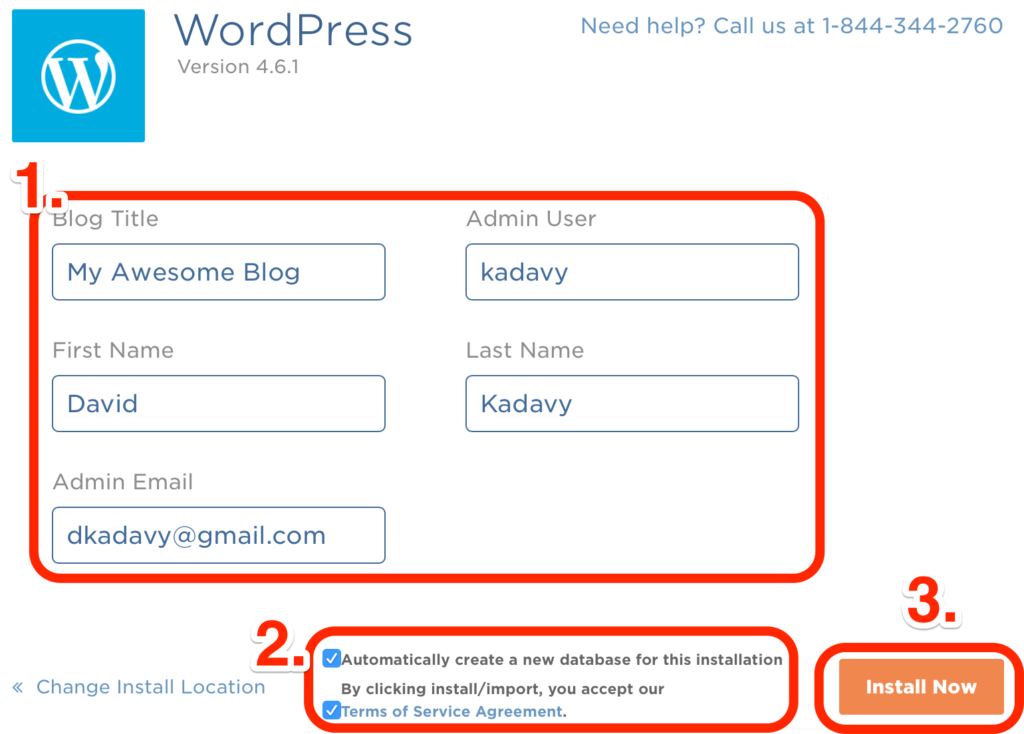
- Enter your WordPress blog details. The title, your username, your first and last name, and your email.
- Check the boxes to create a database (the database is where the text of your blog posts, comments, etc. will live. You don’t have to deal with it. WordPress does that for you.), and review and agree to the Terms.
- Click on “Install Now.” Can you feel the excitement!?
Your installation is complete! You’ve now started your own WordPress blog hosted on your own domain.
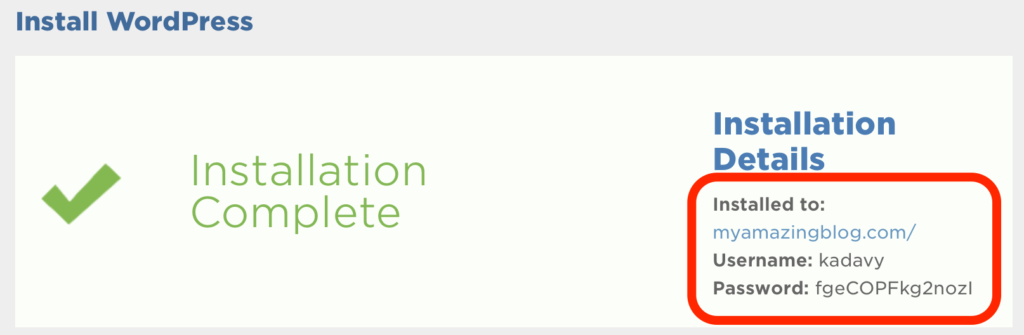
Take note of your URL (your domain), your username, and the password automatically created for you during installation.
Copy the password. Click on your domain (or type it into your browser’s address bar). You should see something like this.
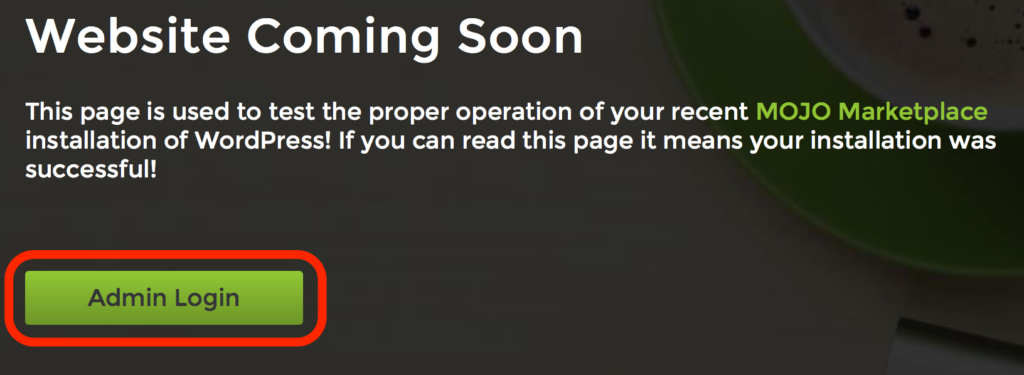
Click on “Admin Login.” This will take you to the login screen for WordPress.
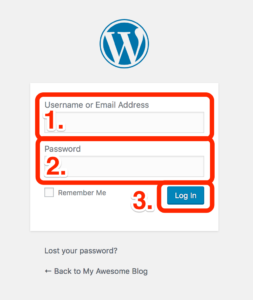
- Type in the username (or email) that you used when installing WordPress.
- Paste the password automatically created for you during installation.
- Click on “Log In.” Are you ready?!
You’re now in the administrative dashboard of your own WordPress blog, on your own hosting plan, on your own domain!
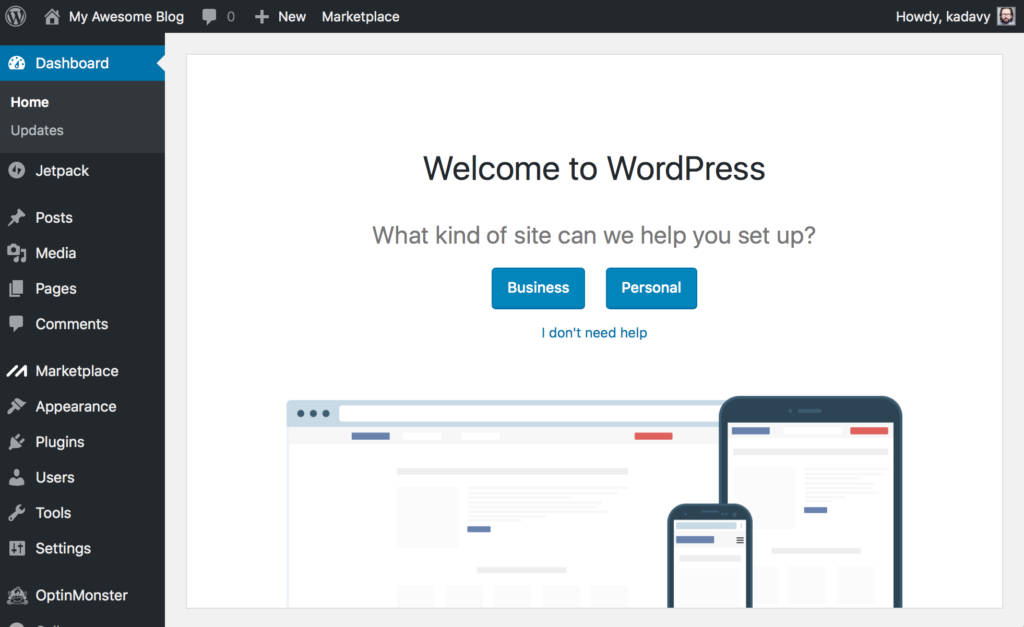
You’ll see a screen to help you get set up. Worry about that later. For now, let’s see your very own WordPress blog in all of it’s beauty.
Open a new browser window, and type your domain into the address bar. You should see something like this.
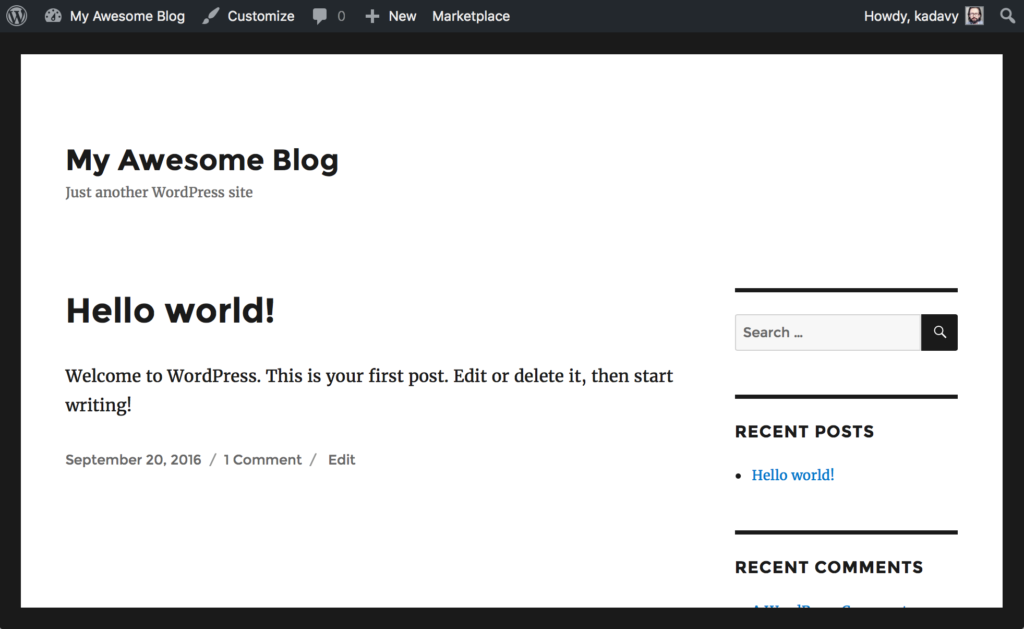
Congratulations! You’re finished! You’re now looking at your very own blog, on your very own hosting plan, on your new domain!
I, for one, am excited for you. I hope you’re excited, too.
In case you haven’t gotten started click here for HostGator’s domain search, or, if you already have a domain, click here to buy a HostGator hosting plan, using a HostGator free trial coupon.